Last updated on: June 29, 2026
The Fundraising feature provides iMIS users the opportunity to create and implement a comprehensive system for managing the fundraising functions within their organizations. The Fundraising feature is scalable - it can be used by small associations that manage a single scholarship fund or large, multi-million dollar foundations that conduct fundraising activities with a variety of purposes, methods, and sources. This tutorial also provides an introduction to Fundraising.
Tip: Before you begin, ensure you have reviewed and completed the iMIS Finance: Getting Started and Best Practices guide.
If you have recently upgraded to iMIS EMS from using the iMIS Desktop, be sure to review the following articles:
- Migrating campaigns and appeals from Desktop to EMS
- Desktop migration to the Staff site
Configuring the required settings and items
The following settings and items are required to be configured before you can begin entering gifts.
Funds, also known as financial entities, are the entities within your organization that serve as asset accounts for your fundraising activities. Frequently, for legal and accounting reasons, an organization must maintain separate accounting records for each gift item.
In iMIS, a fund is an organization. Gifts and pledges are directed to a fund, for example, a capital fund, a fixed asset fund, or a general unrestricted fund.
Warning! Do not delete funds after you have completed fundraising transactions. Deleting funds affects the completed transactions.
Defining funds
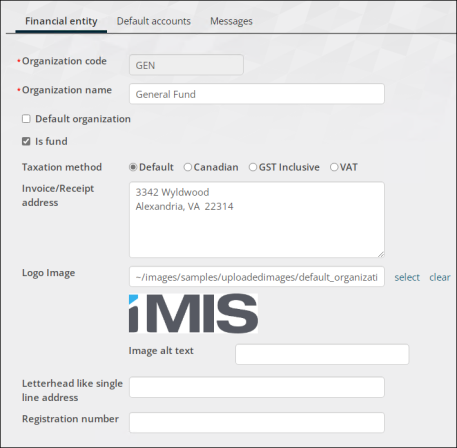
Defining a new fund follows a similar process to defining a new financial entity. Do the following to define a new fund:
- Go to Settings > Finance > Financial entities.
- Select Add new financial entity.
- Enter the fund code in the Organization code field.
- Enter the name of the fund in the Organization name field.
- Enable Is fund.
- Select the appropriate Taxation method option.
- (optional) Enter the fund's Invoice/Receipt address. This designates the mailing address of the fund. Extended characters such as those from the Greek alphabet, are allowed.
- (optional) Select the fund's Logo if available. This designates the fund's logo that is used on reports that include a logo.
- (optional) Enter the Letterhead like single line address if applicable.
- Click Save & Exit.
Understanding where funds are used
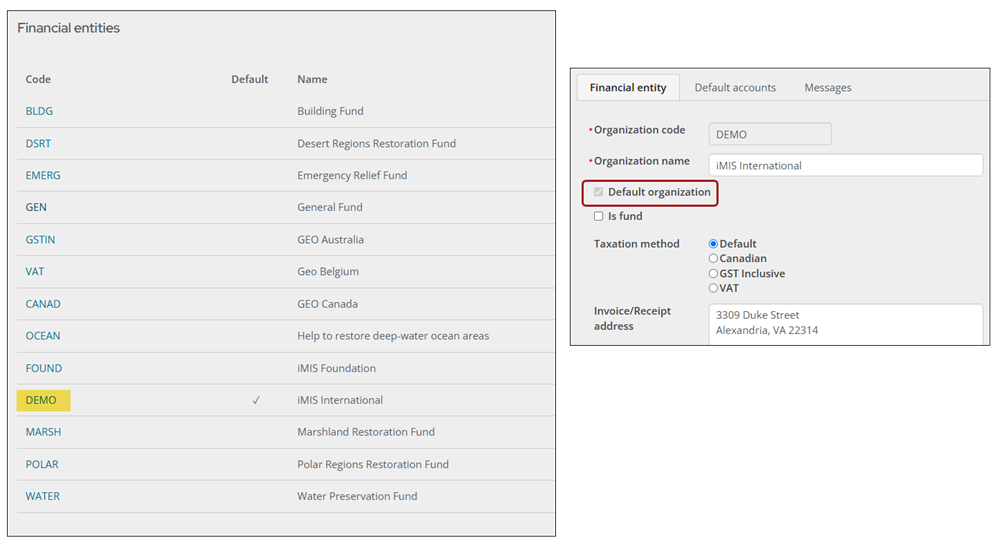
The financial entity directly or indirectly associated with the gift or pledge income and any accounts receivable amount is assigned through this hierarchy:
- Gift item definition: Specific financial entity assigned to the Gift Item on the Accounting tab of the gift definition. The financial entity is assigned here specifically or left unpopulated, which displays as Default.
- Default entities - Fundraising: Specific financial entity assigned for Fundraising under the Default entities at Settings > Finance > General. A financial entity is assigned here or left unpopulated.
- Default financial entity: If a financial entity is not assigned to either of the above, then the overall system default entity is assigned as the financial entity associated with the gift item. This is the entity with Default organization enabled at Settings > Finance > Financial Entities.

The GIFTS product category must be defined before you can create gift items.
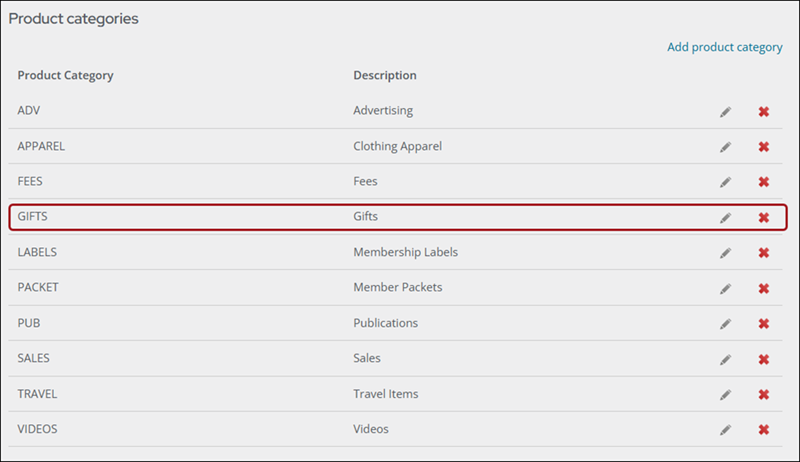
Do the following to ensure the GIFTS product category is defined:
- Go to Settings > Commerce > Product categories.
- Review the list and confirm GIFTS is defined. If GIFTS is not defined, do the following:
- Select Add product category.
- In the Category field, enter GIFTS.
- In the Description field, enter Gifts.
- Click Save.
Gift items are what members and donors donate to, such as a General Distribution fund or an Emergency Relief fund.
Do the following to define new gift items:
- Go to Fundraising > Add gift item.
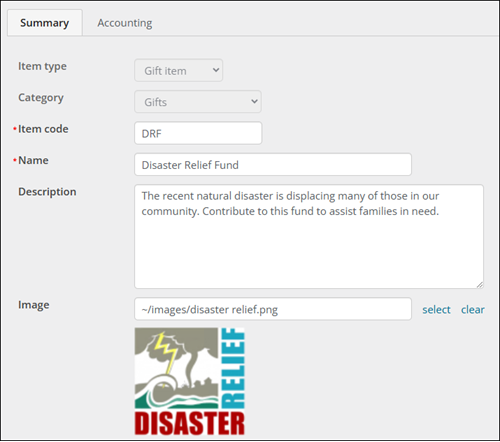
- Enter the Item code. For example, if the gift you are adding is the Disaster Relief Fund, the Item code could be DRF. See Defining gift items for information about item codes.
- Enter the Name and Description of the item.
- Select an Image.
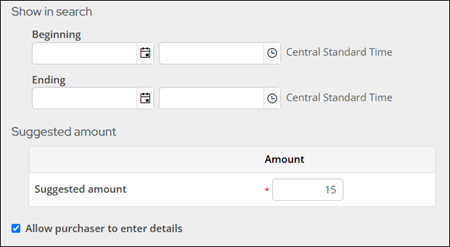
- Enter a Suggested amount. This is the amount that will automatically display when someone is giving to the donation item. Donors can always overwrite the suggested amount.
- (optional) Enter dates and times for Show in search to provide a date range in which your product will show up in searches. Staff users can choose to show inactive products in their search results. Leaving the dates blank means the gift will always appear.
- (optional) Select Allow purchaser to enter details to enable specific details or important notes about a gift item to be added at the time a donation is being made.
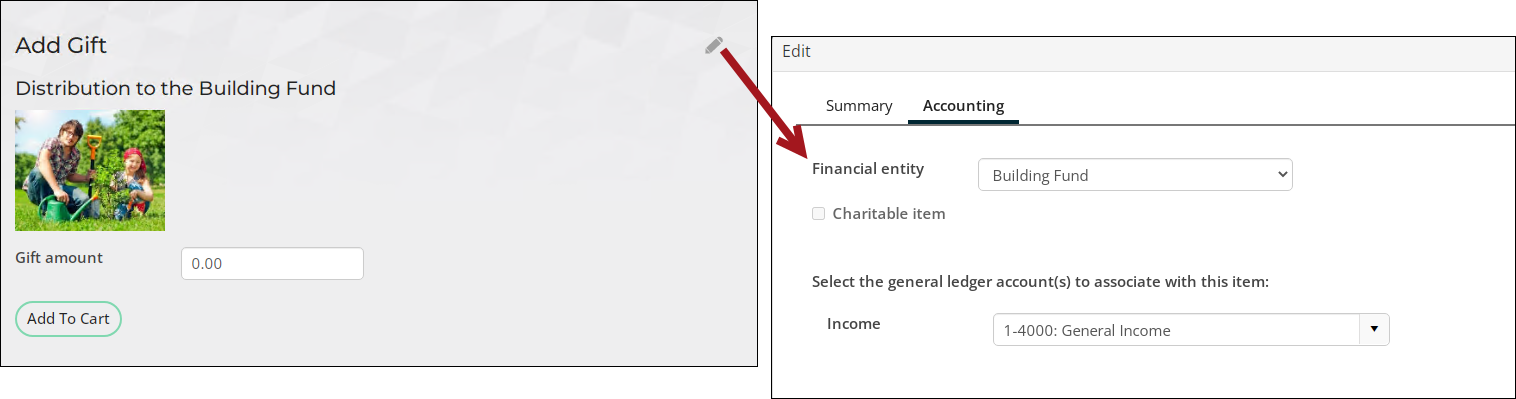
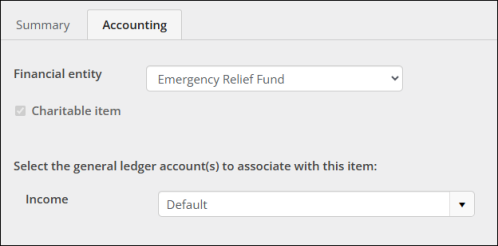
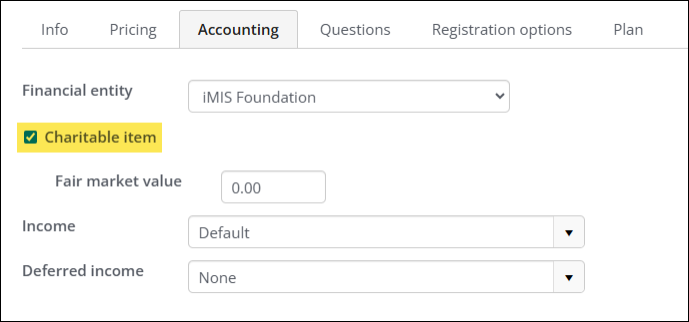
- (Accounting tab) Review the default settings and make any required changes for the item:
- From the Financial entity drop-down, select the fund associated with this gift item or leave it set as to default. All donations made to this gift item will be deposited into this fund.
- Charitable item is automatically enabled and cannot be disabled for gift items.
- Select the Income account to associate with this gift item. Begin typing to populate the field.
- Click Save. The item detail page displays as it will appear to users. In addition, the item will be displayed in the list of product items. The user can click the item name to view details.
- Continue creating gift items as needed.
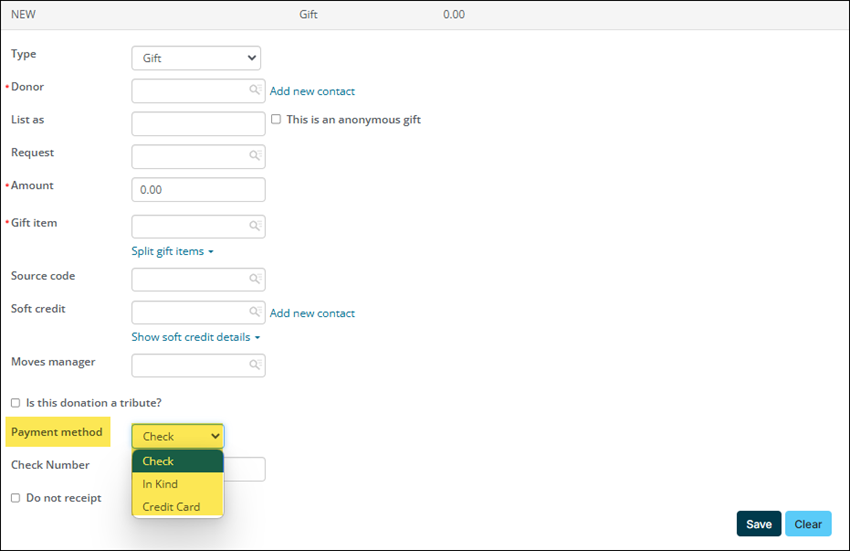
The Fundraising > Enter gifts window is where staff users can enter gifts on behalf of donors. In this window, there is a payment method drop-down that allows staff users to choose the appropriate payment method, such as Check or Credit Card.
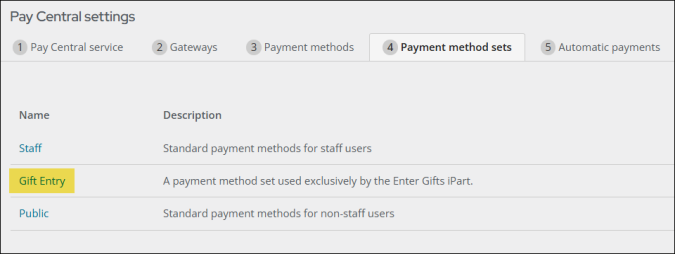
This window has its own payment method set that must be populated with payment methods before gifts can be entered through this window. Do the following to populate the Gift Entry payment method set:
- Go to Settings > Finance > Pay Central.
- Click the Payment method sets tab.
- Select the Gift Entry payment method set.
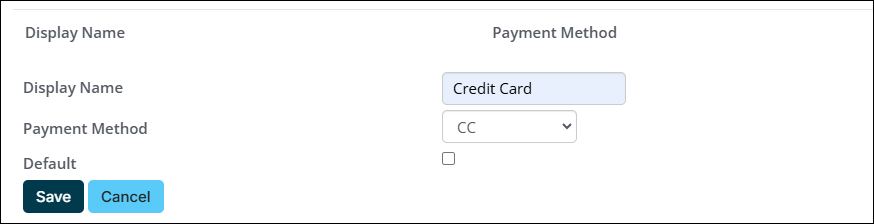
- Select Add new:
- Enter the Display name. This is the name that appears in the payment method drop-down on the Enter gifts window.
- Select the Payment method.
- Enable Default if you want this payment method selected by default.
- Click Save.
- Save the payment method set.
- Continue adding payment methods.
Configuring the additional fundraising features
There are many additional fundraising features that are not required to configure. Review the following information to determine if you need to configure any of the additional features.
The following features are not required to be setup but are available to Fundraising users:
- Receipting – Issue charitable tax receipts on a recurring schedule or manually. Before you begin, you must update the default receipt settings, then configure the receipt communication templates:
- Settings > Fundraising > General: Fundraising Settings
- Marketing > Communication templates: Tailoring the gift receipt and email template
- Source codes – A source code is a short-term activity, such as a mass mailing, email effort, or a telephone solicitation that may be connected to a particular gift item. Source codes are tied to Campaigns, so the campaign must be created before you can begin creating source codes. See Defining fundraising source codes.
- Tribute donations – Donors have the option to designate their donation as a tribute when the donation pages are appropriately configured. Before you begin, ensure the tribute types are configured, then configure the donation pages to allow tribute donations:
- Settings > Fundraising > Tribute types: Tribute Types
- RiSE > Page Builder > Manage content: Tribute donations
- Soft credits – A soft credit is a credit for a behind-the-scenes individual who is responsible for helping obtain a gift or pledge, but who is not listed as the donor. When defining a soft credit individual, you also have the option to define the Type or relationship between the donor and soft credit individual, such as a family member, friend, or co-worker. To define various soft credit types, see Soft credits.
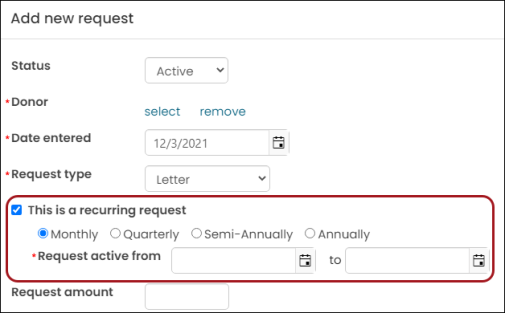
- Fundraising requests – Fundraising requests enable you to track activities such as telephone calls, letters, and notes that ask for a gift or pledge and to associate donations with the requests that prompted them. Before creating fundraising requests, ensure all desired request types are defined, then begin entering requests. See Fundraising requests for details.
- Premiums – A premium is a complimentary gift, such as a coffee mug or t-shirt, that is given to a contributor who donates. Configure donation pages to offer premiums with gift items. See Premiums.
- Moves management – Moves management is a feature that promotes relationships with major donors. See Setting up moves management for details.
- Recurring donations with AutoPay – If you are licensed for AutoPay, you can offer your donors the option to give on a recurring schedule, such as every month or once a year. See AutoPay Getting Started for details.
- Gift Aid – Organizations in the UK can configure the Gift Aid settings under Settings > Fundraising > Gift Aid. See Setting up Gift Aid for full details.
- In-Kind gifts – In-kind gifts are a type of payment method in which goods or services are given instead of money. These in-kind gifts are distinguished from gifts of cash. Each charity can determine what types of in-kind contributions they accept. See Setting up In-Kind gifts for details.
Event functions (registration options and program items) can be configured as charitable items. The fees associated with these functions appear as gifts and are displayed on the registrant’s giving history.
Do the following to designate an event function as a charitable item:
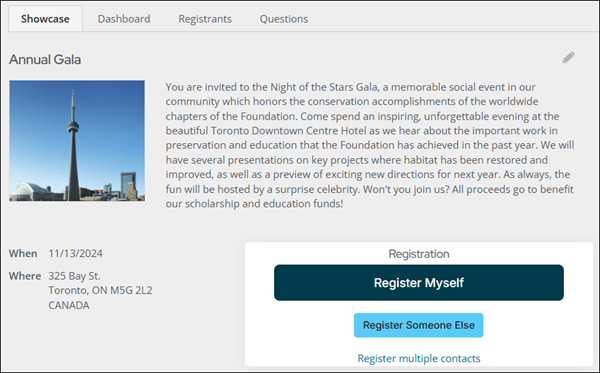
- Go to Events > Find events.
- Select the event.
- Do one of the following:
- Registration option: To designate a registration option as charitable, select the edit icon for the event.
- Program item: To designate a program item as a charitable, scroll down to the Program section, then select the program item. Click the edit icon.
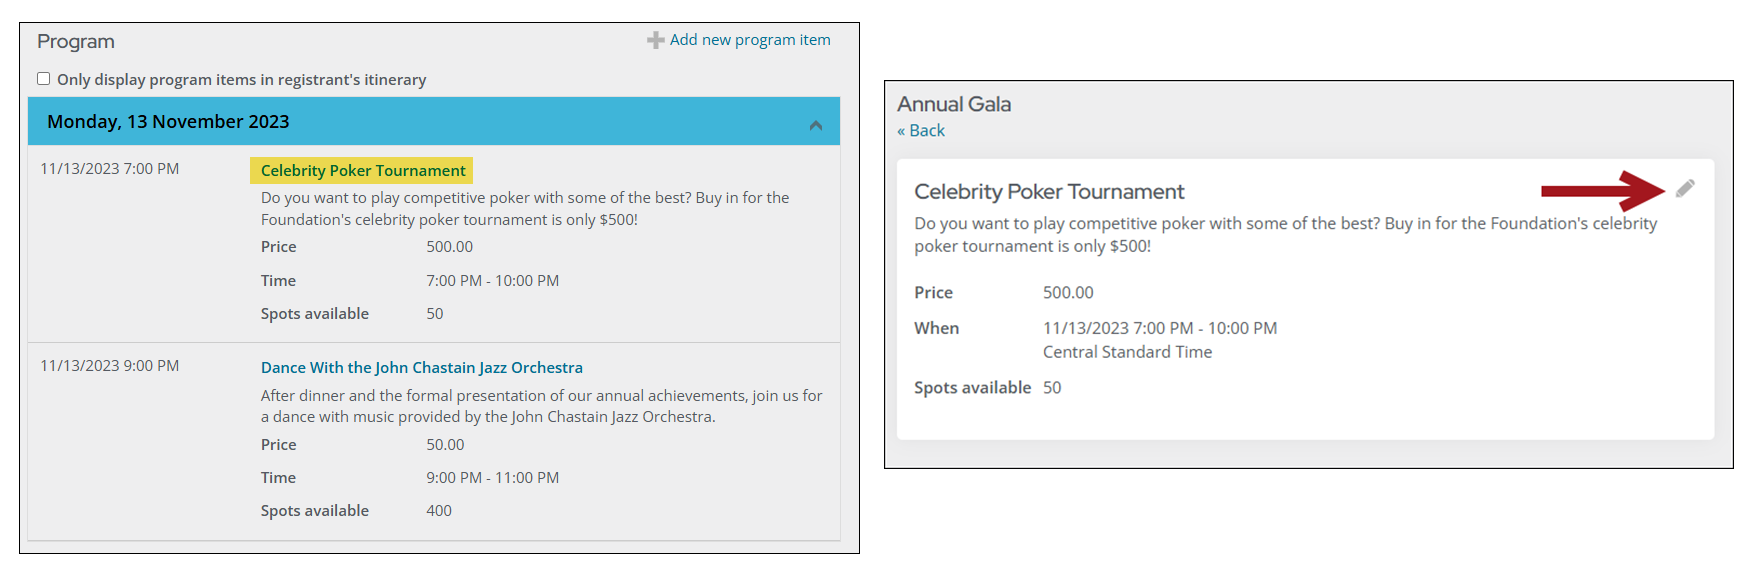
- Click the Accounting tab:
- Enable Charitable item.
- From the Financial entity drop-down, ensure the selected entity is charitable.
- The Fair market value defines the value of the benefit (if any) that a donor is receiving in exchange for purchasing the charitable item with which the Fair market value is associated. For event registrations, the tax-deductible amount is often calculated as the amount of the registration fee minus the Fair market value of any benefits that the registrant receives for their registration.
- Click Save & Close. Repeat the process for all event functions that are charitable items.
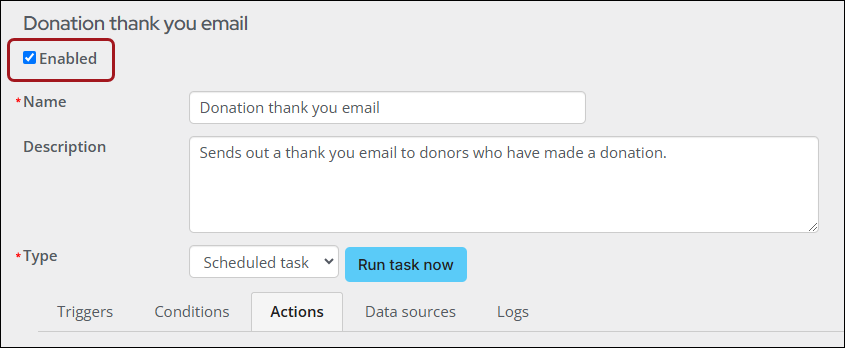
The Donation thank you email scheduled task will automatically send an email to a donor after they have donated. Configure this scheduled task to begin sending thank-you emails to donors.
Copy & Update the communication template
Do the following to copy and update the donation thank you communication template:
- Go to Marketing > Communication templates.
- Navigate through the following folder path: $/Common/Communications/Templates/Samples
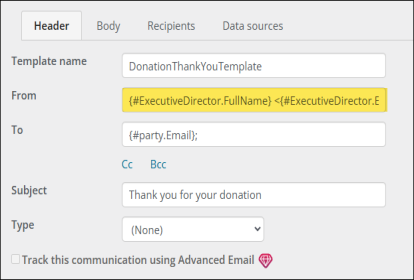
- Double-click the DonationThankYouTemplate.
- Make the required changes:
- From email address - Update the From email address to the email address you want the donation thank you email to come from.
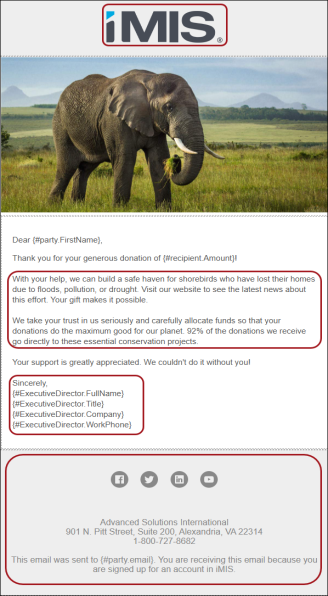
- iMIS and ASI details - On the Body tab, there are iMIS and ASI branding details in the body of the communication template. Update or remove the iMIS and ASI details.
- Body content - Update the body content to make sure it fits with your association's messaging.
- Click Save As.
- Choose the Templates folder.
- Click OK.
Update the scheduled task
Do the following to update the scheduled task:
- Go to RiSE > Process automation.
- Search for the Donation thank you email task, then select the task to open it.
- Click the Actions tab:
- Click the edit icon.
- Remove the selected template.
- Click the Select link.
- Choose the template you just created.
- Click OK.
- Click Save.
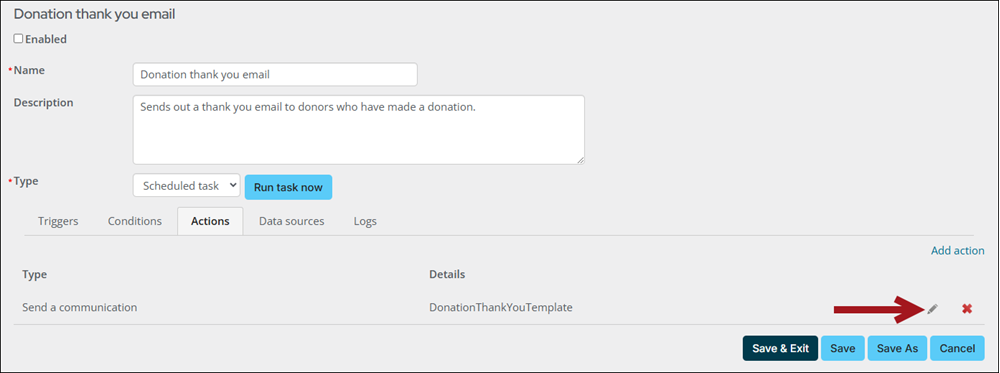
- Select the Enabled checkbox.
- Click Save & Exit.
Offering Give Now from the public website
After the gift items are configured, create Give Now pages to display the content on the public website, so that donors can begin donating to the causes. It is recommended to use the out-of-the-box donation pages as a starting point for your own donation pages.
Note: If you do not want to use the out-of-the-box donation pages, you can create your own donation page. See Setting up a custom donation page.
Depending on your donation needs, the following pages are available.
| Page name | Location | Purpose |
|---|---|---|
| Give Now | @/iCore/Fundraising | Use this page if you need to create a donation page for a single gift item. |
| Give Now with Gift Aid | The same as the Give Now page, plus a checkbox to add Gift Aid. | |
| Give Now Dynamic | @/iCore/Fundraising/Donate | Use this page if you need the gift item added to a URL instead of specifying a specific gift item. While this page does not need to be copied and modified, it does need a gift item’s product ID included in the URL for it to work. Also used for your staff site. |
| Give Now Dynamic with Gift Aid | The same as the Give Now Dynamic page, plus a checkbox to add Gift Aid. |
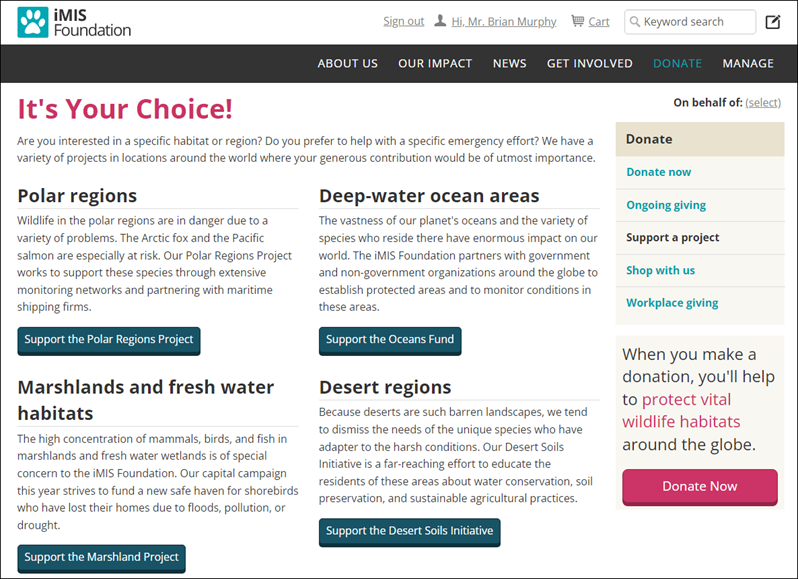
Review the following to understand how to create a Give Now page for a single gift item. The following image is an example of a Give Now page for a single gift item:
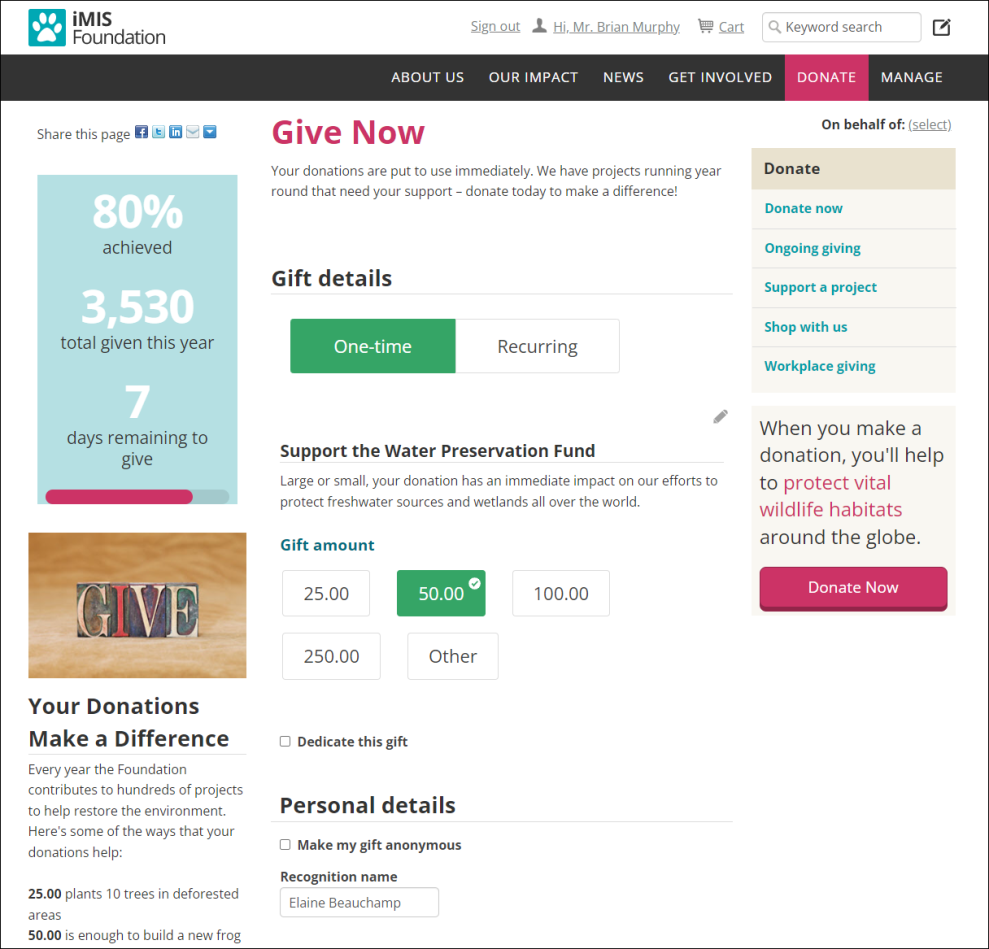
Copy and update the 'Give Now' content record
Do the following to use an out-of-the-box page as a starting point for your own Give Now page:
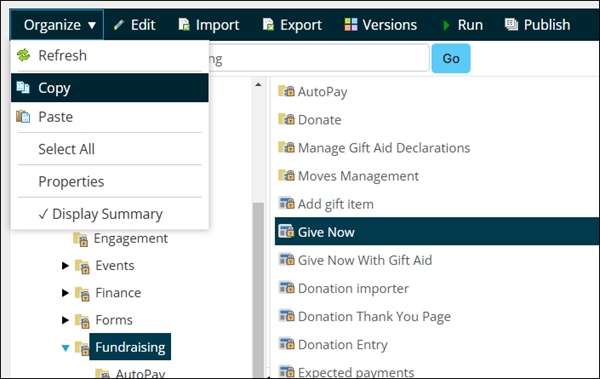
- Go to RiSE > Page Builder > Manage content.
- Navigate through the following folder path:@/iCore/Fundraising
- Copy the Give Now or Give Now with Gift Aid content record (Organize > Copy).
- Navigate to a non-system folder, then paste the content record (Organize > Paste).
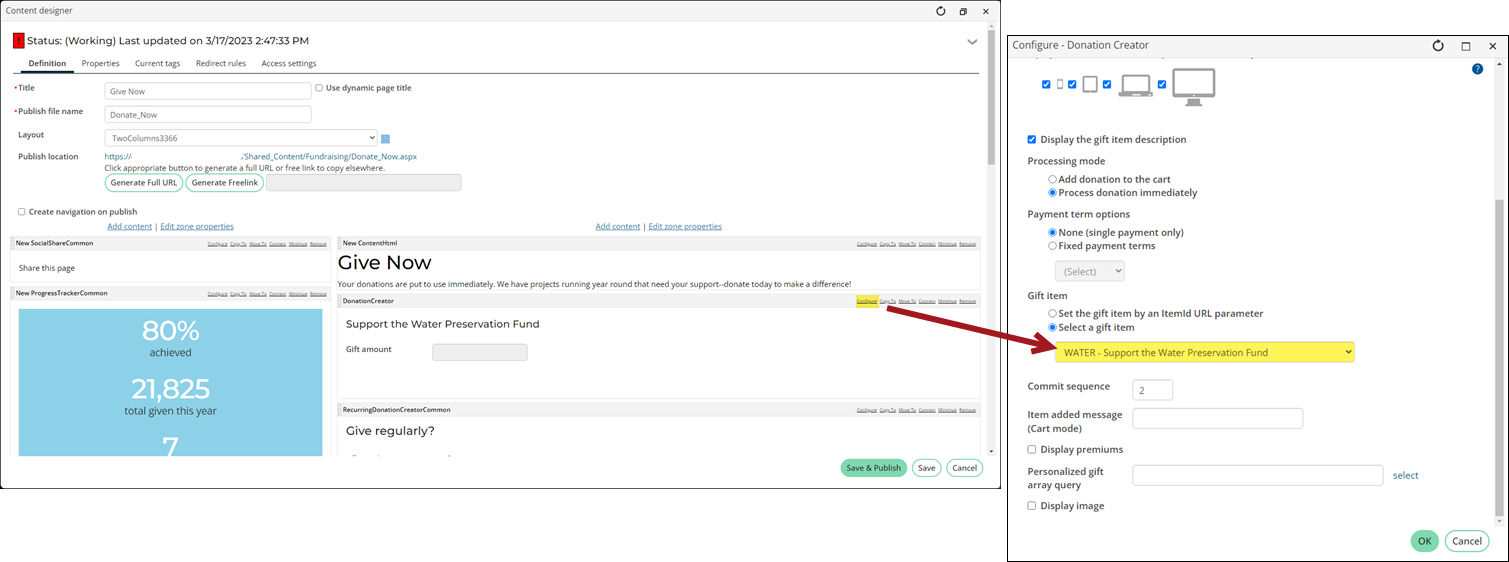
- Open the content record for edit.
- Update the content record, being sure to update the Donation Creator to point to the desired Gift item.
- Save & Publish the content record.
Update the shortcut or Navigation Item
If you are using the GiveNow shortcut on the public website, you should update the shortcut to point to the new content. Do the following to update the GiveNow shortcut:
- Go to RiSE > Site Builder > Manage shortcuts.
- Search for the GiveNow shortcut.
- Click the edit icon.
- From the URL or content record field, select the Give Now content record.
- Click Update.
If you are not using the shortcut and are instead linking directly to a Give Now page from the sitemap, do the following to update the sitemap:
- Go to RiSE > Site Builder > Manage sitemaps.
- Select the website from the drop-down.
- Choose the Give Now navigation item.
- From the Content or URL to link to field, select the copied Give Now content record you created.
- Click Save.
- Click Publish.
Review the following to understand how to create a Give Now page for more than one gift item. The following image is an example of a Give Now page for more than one gift item:
Copy and update the 'Give Now Dynamic' content record
The Give Now Dynamic content record will display each gift item dynamically through a provided Item Id. Do the following to copy and update the Give Now Dynamic content record:
- Go to RiSE > Page Builder > Manage content.
- Navigate through the following folder path: @/iCore/Fundraising/Donate
- Copy the Give Now Dynamic content record (Organize > Copy).
- Navigate to a non-system folder, then paste the content record (Organize > Paste).'
- Open the content record for edit and make the desired changes.
- Click Save & Publish.
Copy and update the 'Support a Project' content record
Do the following to copy and update the Support a Project content record:
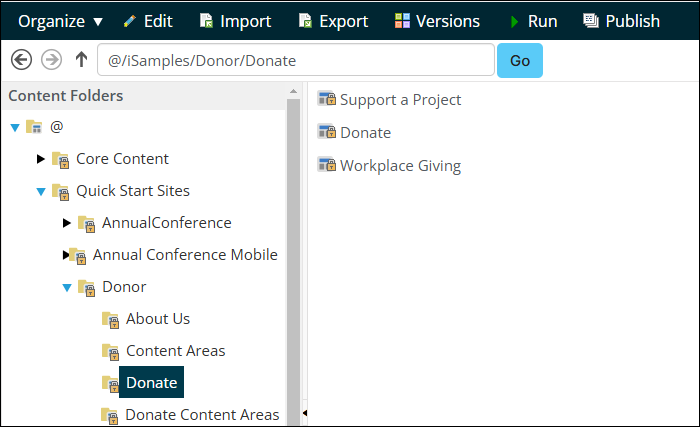
- Go to RiSE > Page Builder > Manage content.
- Navigate through the following folder path: @/iSamples/Donor/Donate
- Copy the Support a Project content record (Organize > Copy).
- Navigate to a non-system folder, then paste the content record (Organize > Paste).
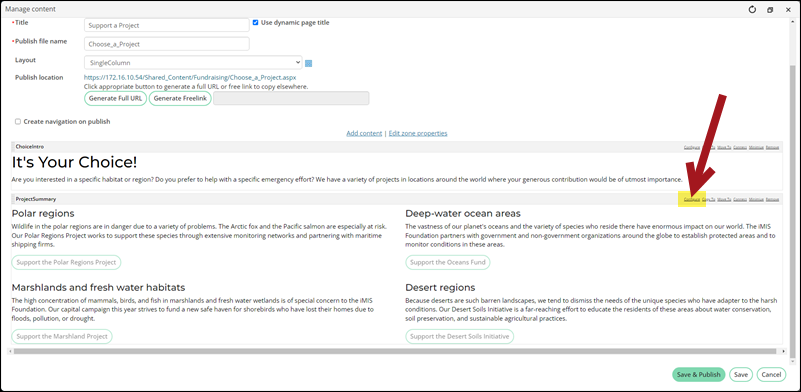
- Open the content record for edit.
- Locate the ProjectSummary content item, then select Configure.
- Update the content on the page, such as the titles, descriptions, and button text.
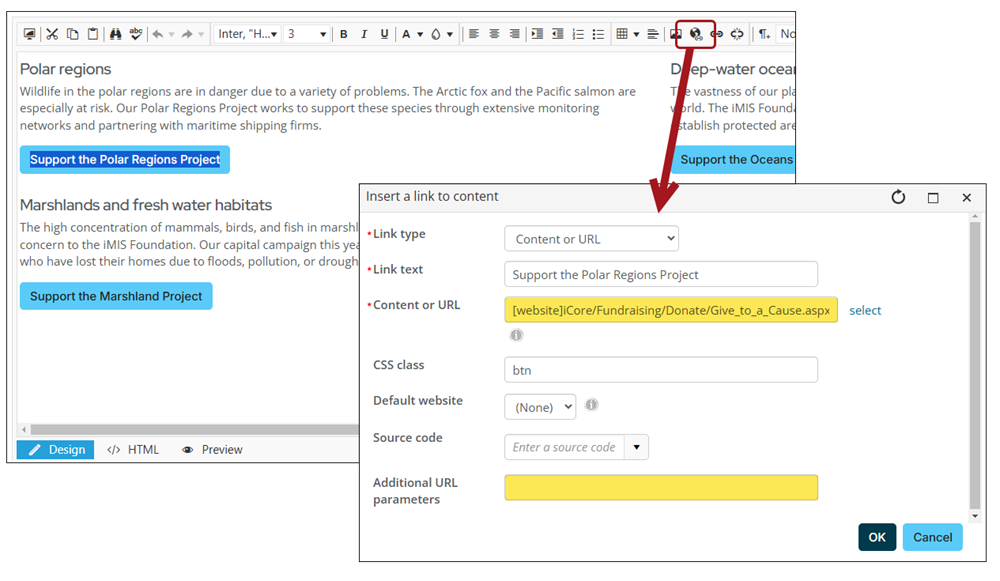
- Update the content record and ItemId for each button:
- Highlight the button link text.
- Click the Content Link Manager button.
- From the Content or URL field, enter ~/GiveNowDynamic. This is the shortcut you will update in the following section.
- In the Additional URL parameters field, enter ItemId=, followed by the Item Id of the project.
- Click OK.
- Repeat step 8 for each button.
- Save & Publish the content record.
Update the shortcut
If you are using the GiveNowDynamic shortcut on the public website, you should update the shortcut to point to the new content. Do the following to update the GiveNowDynamic shortcut:
- Go to RiSE > Site Builder > Manage shortcuts.
- Search for the GiveNowDynamic shortcut.
- Click the edit icon.
- From the URL or content record field, select the copied Give Now Dynamic content record.
- Click Update.
Update the Navigation Item
You must update the navigation item to point to the Support a Project content record. Do the following:
- Go to RiSE > Site Builder > Manage sitemaps.
- Select the website from the drop-down.
- Choose the donation navigation item.
- From the Content or URL to link to field, select the Support a Project content record you created.
- Click Save.
- Click Publish.
Entering gifts as a staff user
iMIS makes giving simple for donors and members. Staff can easily enter gifts and pledges through the Staff site, while your members and contacts can give through your public sites. This section covers the various ways of giving.
Staff can enter gifts, pledges, and installment pledges directly through the Enter gifts (Fundraising > Enter gifts) window, saving your organization valuable time. See Entering gifts for full details.
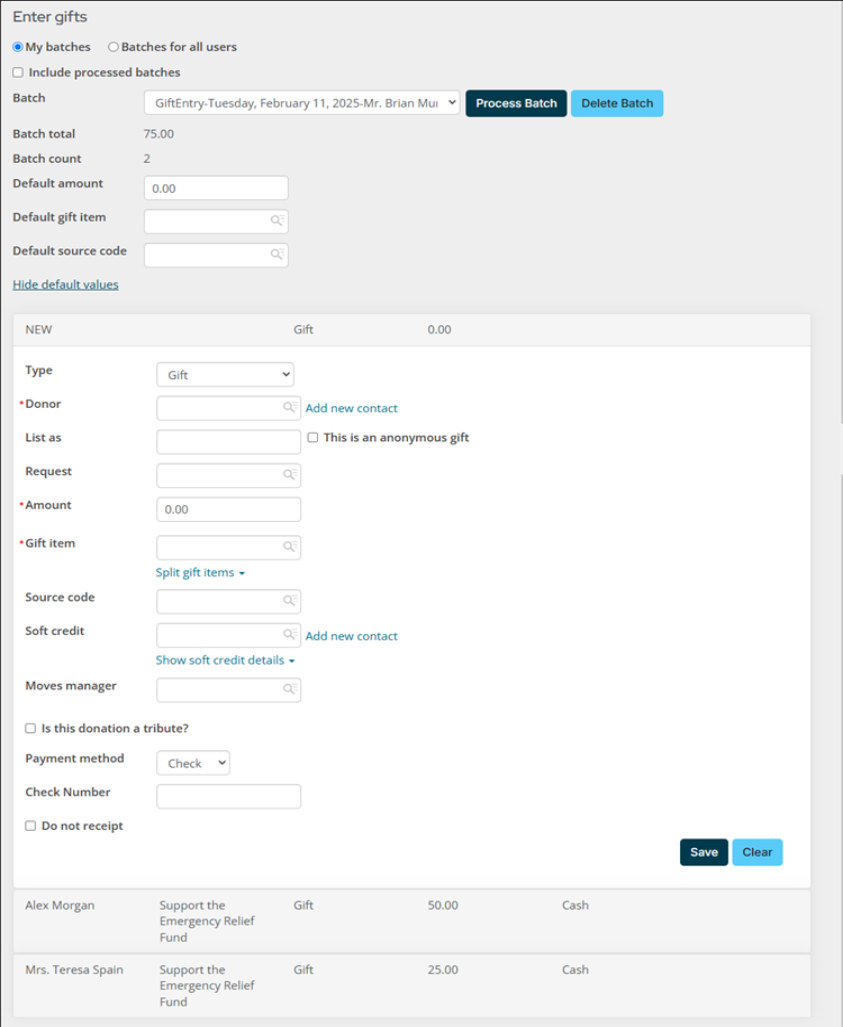
Types of donations
Staff can enter any of the following donations from the Enter gifts window.
- Gift – A gift is paid at the time of entry. This means that you have already received the payment from the donor, such as cash or a check.
- Pledge – Pledges are unpaid gifts that are invoiced to be paid in the future.
- Installment Pledge – Pledges paid by scheduled installments. Selecting this option splits the donation into multiple invoices.
Batches
Although gift entry batches are separate from accounting batches, transactions from gift entry batches may end up in an accounting batch (Finance > Batches) if the gift entry and accounting batches are for the same date. The transactions remain separate in the gift entry batches when you return to the Enter gifts window (Fundraising > Enter gifts).
Only batches created in the Enter gifts window will appear in the Batch drop-down.
If needed, adjustment batches can be created. Select New adjustment batch from the Batch drop-down, and continue entering information. See Adjusting gift and pledge details for more information.
You will see credit card payments entered through the Enter gifts window appear as pledges. To process these payments, you will need to do one of the following:
- Manually run the Retrieve processed payments from Pay Central scheduled task
- Schedule the Retrieve processed payments from Pay Central task to run on an automatic schedule, so there is no manual process involved
See Using the 'Retrieve processed payments from Pay Central' scheduled task for full details.
After one of the above are completed, staff users can review the results of credit card payments made through the Enter gifts window:
- Go to Finance > Pay Central > Automatic payment transactions.
- Search for and review the payments you entered through the Enter gifts window.
- For any payment for which the Result is not Completed, you must intervene to complete the transaction. Contact the donor for updated payment information, and pay the open unpaid invoice.
AutoPay allows your donors to give on a regular basis. You can also configure AutoPay to allow donors to cancel their own recurring enrollments.

See the following articles for more information regarding AutoPay:
Fundraising requests allows you to track activities such as telephone calls, letters, and notes that ask for a gift or pledge and to associate donations with the requests that prompted them. A request may only be associated with one gift or pledge. Once you associate a gift or pledge with a request, that request is no longer available for further gift entries.
See Fundraising requests for more.
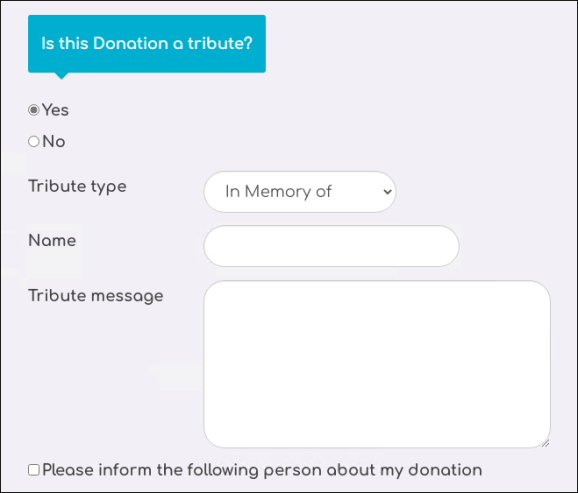
When you add the Tribute Gift Editor to your donation page, donors have the option to indicate if their donation is a tribute. They can choose to make their donation in honor, in recognition, or in memory of someone and enter a tribute message. If they choose to notify someone of their donation, the recipient information they enter creates a new contact in your database. The creation of duplicate contacts is minimized by checking to see if another contact already exists with the same name, address and/or email.
To allow tribute donations, add the Tribute Gift Editor to a content record that contains the Donation Creator and then create a connection between the two content items. Allow donors to request a notification of their gift by configuring the Tribute Gift Editor to display the notification option. Once a donor submits a gift with a request to notify a contact, staff users are able to print and/or email a notification for the specified tributee.
See Tribute donations for details.
Many organizations have third-parties, such as volunteers or telemarketers, collect donations on their behalf. Staff users can import donor and donation data into iMIS if the data is saved in a file format recognized by the iMIS Donation Importer.
Before you begin importing donations, you must verify the following information:
- IDs for customer records exist in iMIS. See Customer types for more.
- At least one cash payment method is set up. See Payment methods for more.
- Address settings are properly configured. See Addresses for more.
- Code values are used instead of descriptions or titles in the import file. For example, BLDG is the code used for the Distribution to the Building Fund gift item.
- Source codes and campaigns are properly configured. See Creating a basic campaign for more.
- The gift items are marked as charitable. See Defining gift items for more.
Donor and donation data file
To import donor and donation data, you must enter the data in a tab-delimited file that contains the necessary columns. Most spreadsheet applications, such as Microsoft Excel, can create tab-delimited files (.txt). You must arrange the columns in the tab-delimited file in the same order as they are listed in the table. See Creating the donor and donation data file to view the table and other important information.
importing the donor and donation data
Once the file has been properly formatted, do the following to import the donor and donation data:
- Go to Fundraising > Import donations.
- Confirm that Donations is selected in the File Format field.
- Browse to select the tab-delimited file that contains your donor and donation data.
- Click Upload. The tab-delimited file you upload converts to a format that displays in the Process import files list.
- (optional) If you want to correct errors in the data file, click Download errors to download a tab-delimited file that only contains the rows that were not imported. This button will not appear if the data file contained no errors. If your data did contain errors, you can correct the errors in the file and try to import again.
- Click Process. The donor and donation data is processed, adding and updating contacts for the donors and adding and posting donations. The batch entry is removed from the file list.
- View information about the processed data in the Review log files list. The Status column will display the batch as either Posted or with an Error. If the batch contained a warning or error, click the toggle next to the Batch Name to expand and view the Result Text. Resolve any warnings or errors.
- If you want to correct warnings or errors in the data file, create a new tab-delimited file that contains just the warning and errors. Do not include data that has already been successfully imported. Correct the file, then upload and process it again.
A new batch with the donation date is created for the imported fundraising gifts. This batch will use the default cash account defined by the default organization.
Note: The Import donations page uses the File Importer for Web Services content item to import donor and donation data.
Note: Rows in the tab-delimited file that contain improperly formatted data or that do not contain required fields are not imported. Error messages list the rows that are not imported and explain why these rows cannot be imported. Even if the file contains rows that cannot be imported, the rows that contain all of the required information in the proper formats will still be imported.
Completing post-donation processes
After donors have given to causes, you may need to issue receipts, adjust any errors or discrepancies, or even reverse a gift or pledge. This section covers the various post-donation processes that are available to staff users.
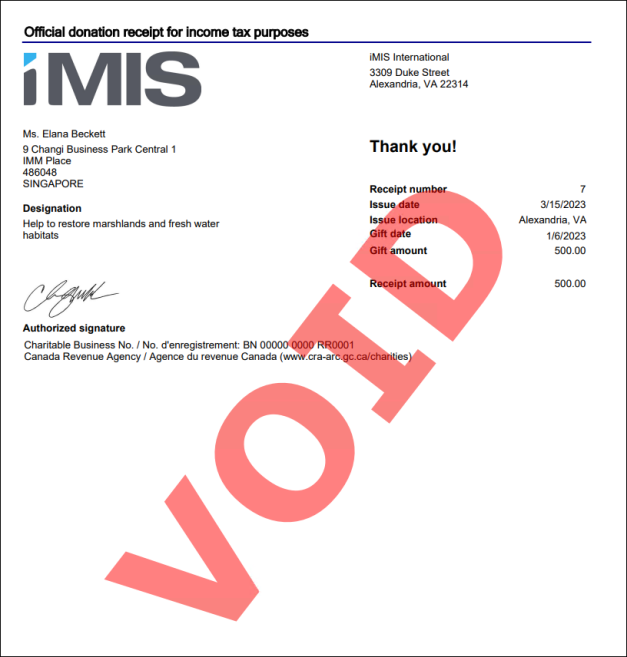
Any donation, charitable event registration, or purchase of a charitable item can be issued a receipt. You have the option to automatically issue receipts as they are received or manually issue receipts:
- Automatically issuing receipts – There are three out-of-the-box scheduled tasks that you can utilize to issue receipts automatically. You must enable the scheduled tasks to begin automatically sending gift receipts. Receipts that are sent automatically by way of email are logged as an interaction with the donor and can be reprinted. The three out-of-the-box tasks are:
- Issue Gift Receipts – Immediately
- Issue Gift Receipts – Monthly
- Issue Gift Receipts – Daily
See Automatically issuing gift receipts for full steps.
- Manually issuing receipts – When manually issuing receipts to donors, staff users have the option to email or print the receipts.
See Manually issuing receipts for full steps.
Important notes
- Before you issue receipts (automatically or manually), you must tailor the gift receipt template that will be sent to donors with both print and email receipts. See Tailoring the gift receipt and the email template for more.
- If there are any errors present in the communication template, receipts will fail to send. When receipts fail to send due to error, you must amend the template, find and void the receipt, and then reissue the receipt with the corrected communication template. The Receipt logs displays the error that caused the receipt to fail. See Reviewing the receipt logs for more information.
- It is highly recommended that you use the out-of-the-box DonationReceipt.rdl as a starting point for your custom receipt.
- If you need to tailor the gift receipt, the following parameters are required in the RDL:
- ReceiptKey
- PartyId
Voiding receipts
There may be instances in which a donation receipt must be voided. The following scenarios result in gift receipts being automatically voided:
- Adjusting a gift payment associated with a receipt that was already issued.
- Cancelling a charitable event registration or program item registration.
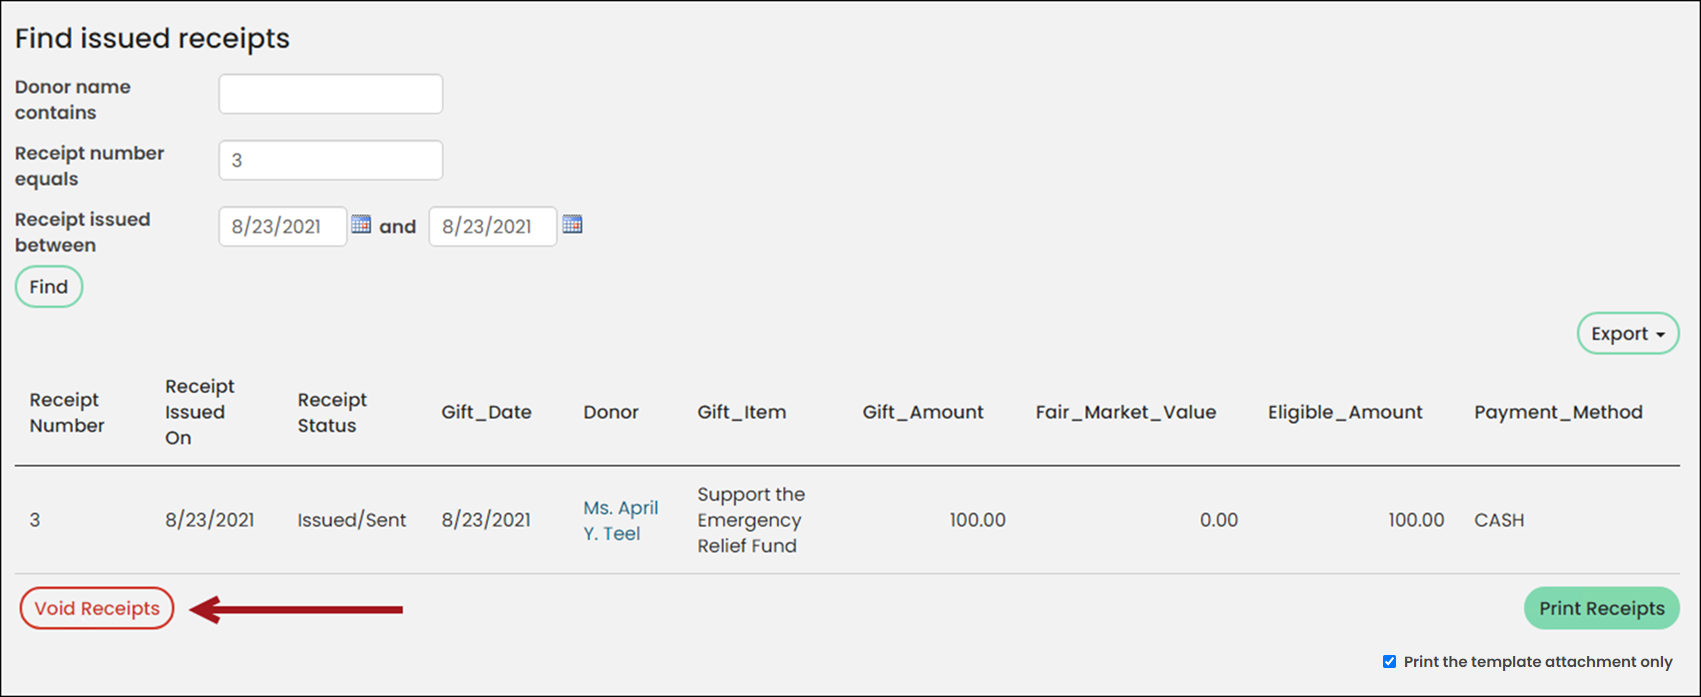
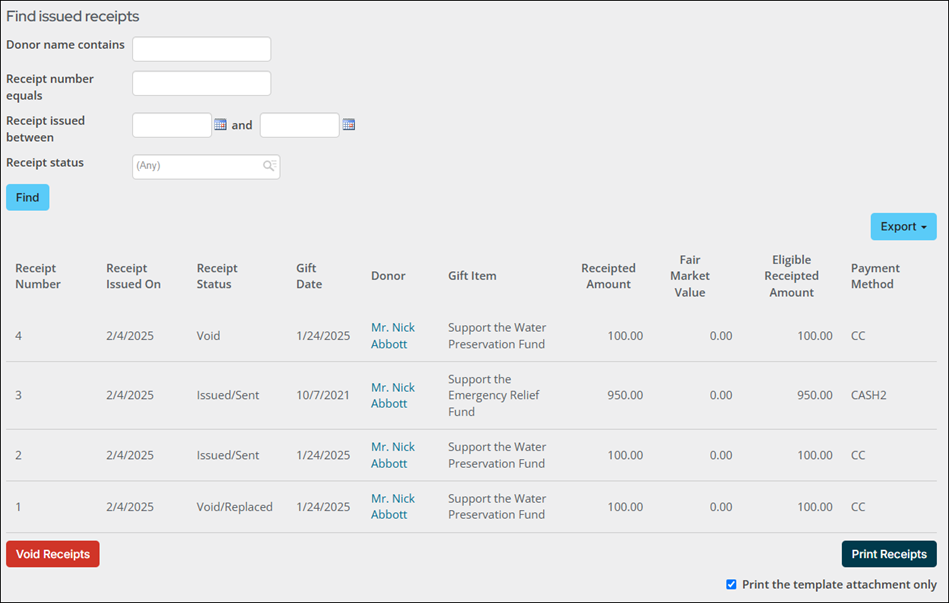
To manually void a receipt, do the following:
- Go to Fundraising > Receipting > Find issued receipts.
- Use the available search options to locate the receipt.
- Click Void Receipts.
- Click OK to confirm.
See Voiding and issuing replacement charitable receipts for more information.
Viewing receipts
To find issued receipts, do the following:
- Go to Fundraising > Receipting > Find issued receipts.
- To filter the list of receipts, enter a parameter, such as a donor name, receipt number or a date range, then click Find.
- To print the receipts, click Print receipts. Printing a receipt marks it as Sent if it has not already been sent.
- You will see a confirmation message that says the selected receipts have been submitted for processing. Go to Fundraising > Receipting > Receipt logs to review the results. See Reviewing the receipt logs for more information.
Reviewing gift and pledge details is an important step in the fundraising process. If a gift, pledge, or installment pledge payment Result is anything other than Completed, you need to examine the payment further to determine if it has failed. See Reviewing incomplete gift payments for more information.
Note: To search for gifts, a staff user must have a Fundraising: 2 module authorization level.
Staff user
Staff users can view important details such as donor information, gift details, accounting information, payments, receipts, tribute information, soft credit, and more. Staff users can also access the Invoice Summary page for a gift or pledge from an account page. The Invoice is available under Giving history on the Giving tab.
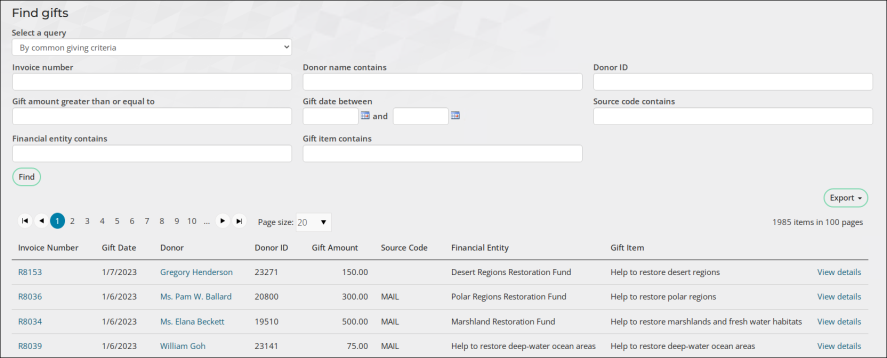
To view details about a specific gift, pledge, or installment pledge, do the following:
- Go to Fundraising > Find gifts.
- Select a query displaying gifts or pledges.
- Select the View details link to view more information about the specific gift or pledge.
- The Gift information page displays for gifts, and the Pledge information page displays for pledges. From here you can view the available information about this gift, including accounting details, tribute information, payments, and soft credits. If the gift is part of a recurring donation, you can view information about the recurring donation enrollment.
See Finding gifts for more information.
Public User
Your donors can view details of their gifts and pledges from the Donation History area on the My Participation tab on their member account pages. Public users can also access the Invoice Summary page for a gift or pledge under Closed invoices on the My Participation tab.
Batches
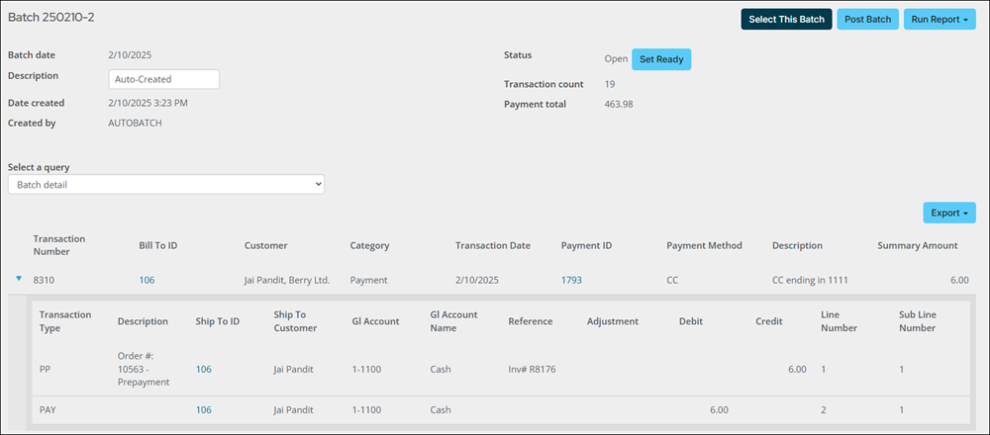
Staff users can also view certain gift and pledge details from the Finance > Batches window. The Open recurring donation batches query allows staff users to see only batches containing recurring donation transactions. Selecting the Batch Number opens the Batch detail page, where you can expand each transaction to view details regarding a specific gift or pledge.
Staff users can adjust non-financial gift and pledge details, such as the source code, notes, list as, tribute information, and moves manager, regardless of the outstanding balance or receipt status. Review the following notes before working with adjustment batches:
- Adjustments are not submitted until Process Batch is clicked.
- For gifts and pledges that have associated receipts, the receipt will be voided if the Donor, Gift item, or Gift date is adjusted.
- When the date or gift item is adjusted, the original invoice is reversed, and a new invoice is created.
Do the following to adjust gift and pledge details:
- Go to Fundraising > Enter gifts.
- From the Batch drop-down, select New adjustment batch.
- Enter the Batch date.
- Click Create Batch.
- Click Find Gift to Adjust:
- Use the available search options and click Find to locate the desired gift.
- Select the Invoice number.
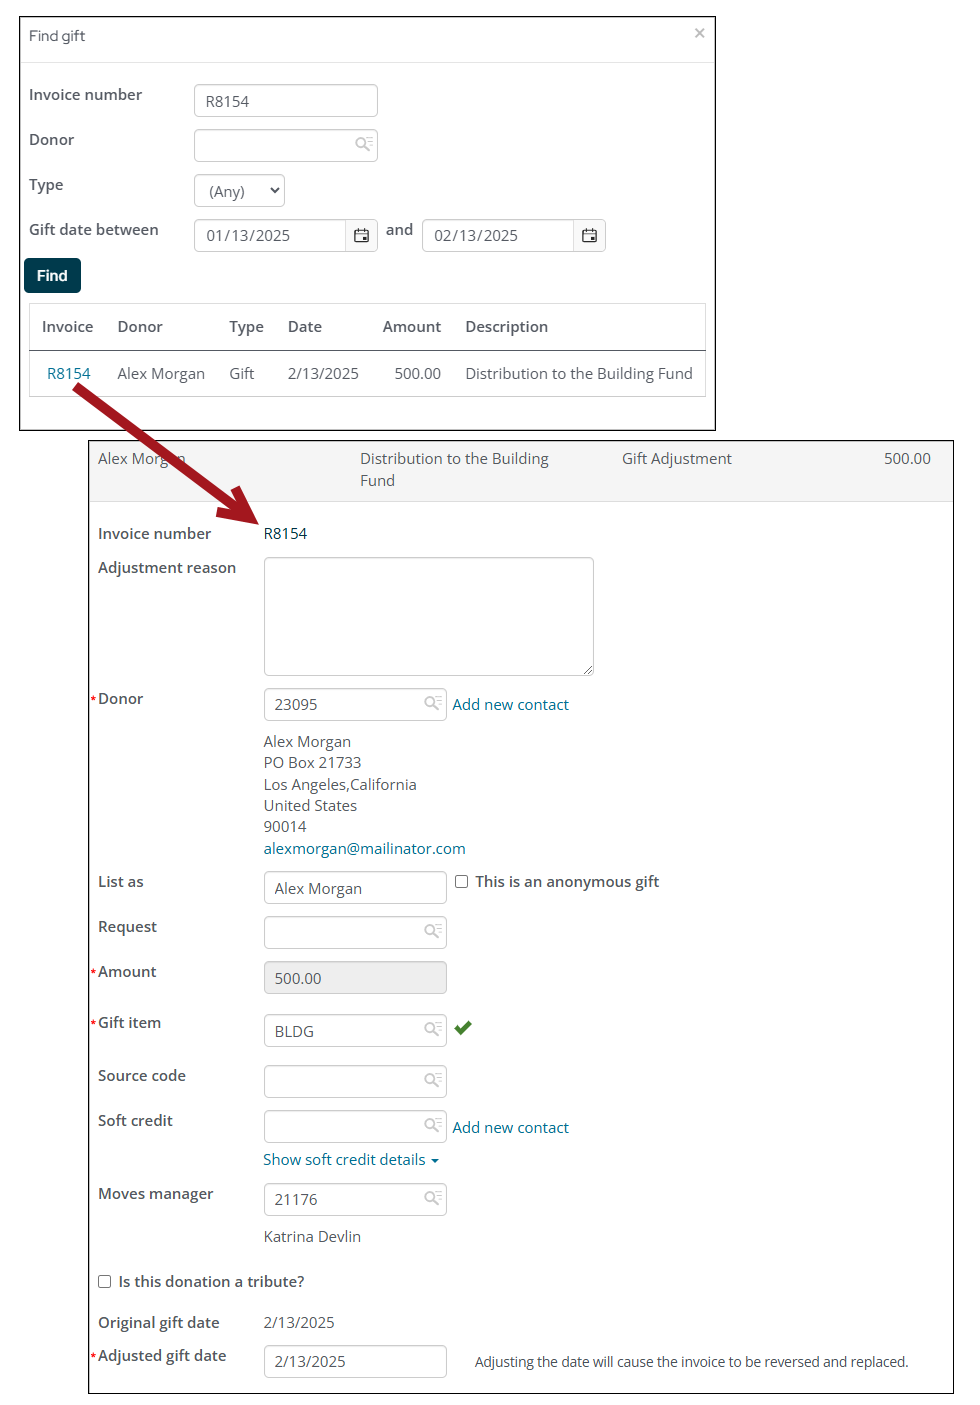
- Adjust the necessary information:
- Adjustment reason - Added to the Adjustment log.
- Donor – Select a new contact or add a new contact.
- List as - Enter a different List as value.
- Request - Select a request to be associated with this gift. See Fundraising requests for more information.
- Gift item - Begin typing in the Gift item to locate different gift items.
- Source code - Select a Source code. The Source code lets you track the campaign or other source that motivated the donation, which can then be used for analysis or targeted search results.
- Soft credit - Type an ID or name to search for the contact to which you want to assign the Soft credit.
- Moves manager - If there is a moves manager associated with this gift, type an ID or name to find the Moves manager.
- Specify additional details - Select this link to add additional details about the adjustment.
- Is this donation a tribute? - If this gift is a tribute, select the Is this donation a tribute? option. If selected you can then enter the tribute details.
- Adjusted gift/pledge date - The default value for this field is the currently selected batch date. Edit this field to select a different gift date. The field cannot be updated for gifts and pledges associated with adjusted payments, or for split gifts.
Important! If the Summarize exported journal entries by setting is set to Detail, and the transactions for the gift or pledge have already been exported, you cannot adjust the Donor ID. See Exporting general ledger transactions for more information.
Note: The Gift item cannot be updated for gifts and pledges associated with adjusted payments, or for split gifts. When adjusting split gifts, Multiple gift items displays in place of the Gift item field.
Important! The Specify additional details link is only available if a custom single instance invoice panel is created and explicitly named Gift Entry Additional Details. Any fields present in the pop-up window match those used in the panel. See Adding custom data to gifts, pledges, and gift adjustments.
Note: Receipts associated with the pledge or gift will be voided if the Donor, Gift item, or Gift date is adjusted. If an adjustment results in voided receipts, a message displays noting the numbers of the voided receipts. These receipts can be reissued after the batch is posted. For more information, see Voiding a charitable receipt.
- Click Save.
- If desired, find additional gifts or pledges to adjust in the same batch.
- Click Process Batch to submit the adjustments.
- Go to Fundraising > Adjustment logs to review the adjustment.
See Adjusting gift and pledge details for full steps.
Consider the following scenarios:
- A donor gave your organization a donation of 1,500.00, but the check did not clear. The donor does not intend to provide another check, so this gift must be reversed.
- A staff member entered a gift as a 500.00 check, but the check was only for 50.00. Now, the gift must be corrected.
When these scenarios occur, you can use iMIS to adjust or reverse gift, pledge, and installment pledge invoices.
Important! Gifts and pledges cannot be deleted, they must be reversed.
Reversing an invoice is not available if there have been any previous adjustments to the invoice (quantity, price, shipping, and/or handling). If the invoice was already paid, the related payment must be reversed before the invoice can be reversed.
Do the following to reverse a gift, pledge, or installment pledge invoice:
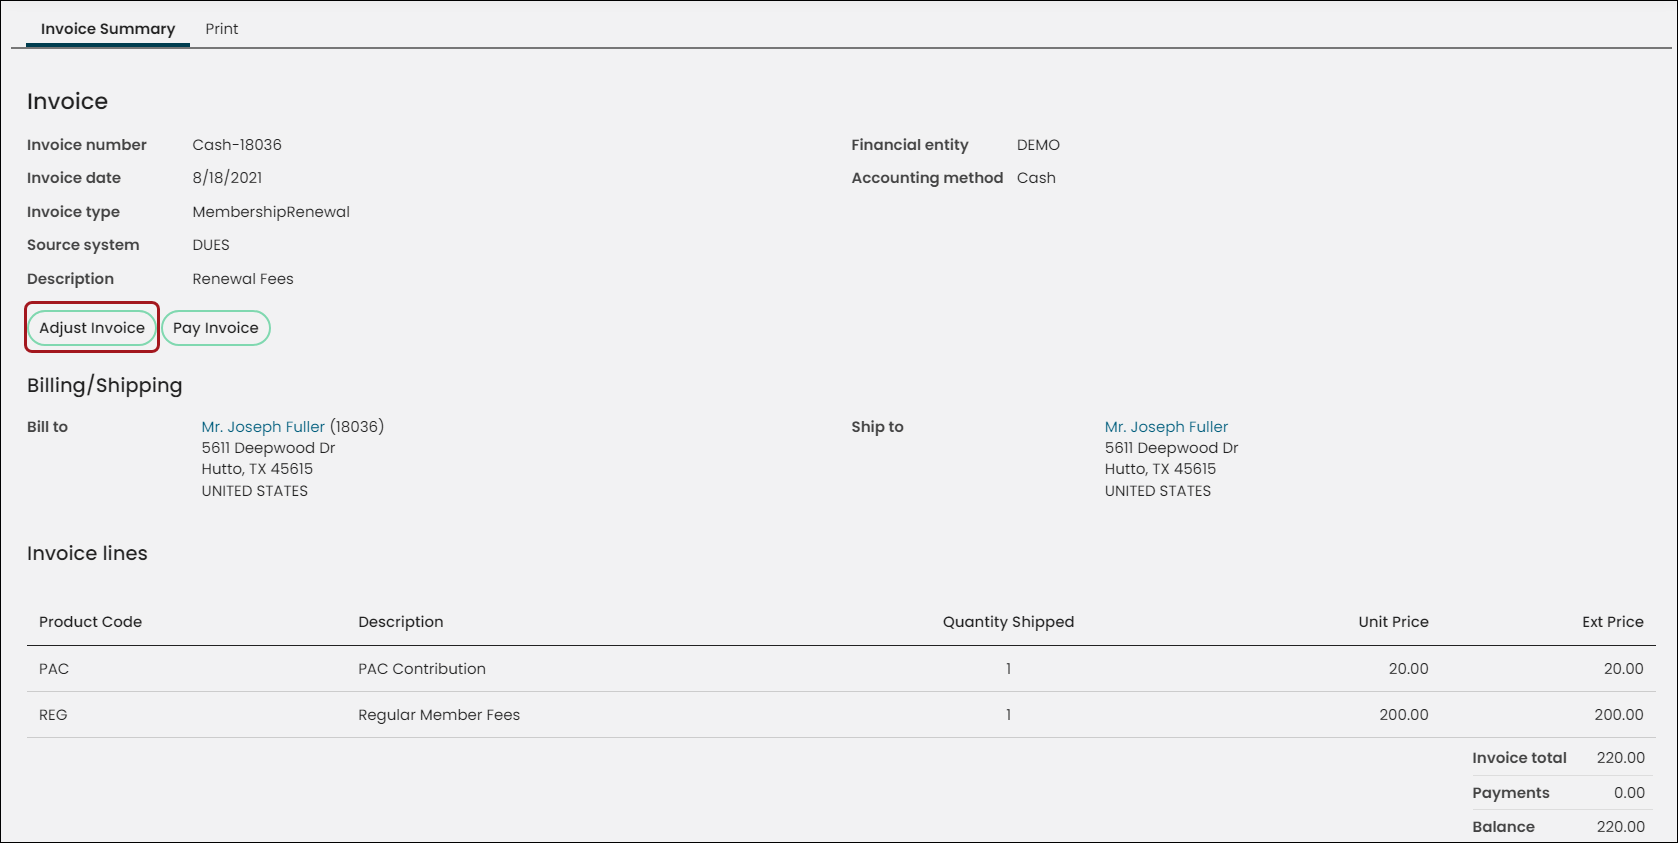
- Go to Finance > Invoices.
- Select an invoice, or search for an invoice.
- Click Adjust Invoice. The Adjust Invoice button will not appear if the invoice is paid and has a balance of zero. If the invoice has already been paid, you must first reverse the payment.
- From the Adjustment type drop-down, select Reverse the invoice. This option will not appear if the invoice was previously adjusted or already reversed.
- For a pledge, the reversal amount is equal to the invoice balance on the pledge.
- For an installment pledge, the balance on each remaining installment is reversed.
- The Transaction date field will automatically populate to the current date. This date can be changed to any date between or equal to the original invoice date and the current date.
- Enter a Reason for reversal.
- Click Submit.
The adjustments are displayed at the bottom of the invoice Adjustments panel, along with the Adjusted Amount. For an installment pledge, the Adjustments panel displays each scheduled payment, along with the Adjusted Amount.
There are many ways to report on your fundraising efforts. Review the following articles to learn more:
- Fundraising business objects - Us these business objects to create your own fundraising reports.
- Report Writer - To find these reports, go to Reports > Report Writer.
- SSRS - In the out-of-the-box Fundraising reports, a gift is considered to be any purchase of an item that is marked as a Charitable item. To access Fundraising reports, go to Reports > Fundraising reports.
Reviewing fundraising data
The out-of-the-box account pages provide a Giving tab that contains important details about donors, their giving history, and more.
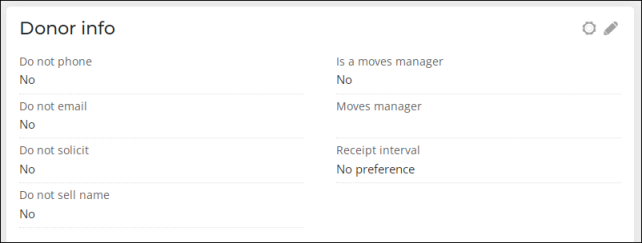
DONOR INFO
Use the Donor info panel to define the following about the donor:
- Contact preferences – Update the donor’s contact preferences to specify how they do or do not want to be contacted about fundraising opportunities.
- Moves management – The moves manager properties are defined for those who are moves managers or those who are working with a moves manager. See Setting up moves management.
- Receipt interval – The Receipt interval property is where a donor can configure how often they want to receive their charitable tax receipts.
PRINT DONOR PROFILE
The Print Donor Profile button prints the Donor Profile report for the selected contact. This report returns a fundraising profile for the selected contact, including gifts, pledges, soft credits, yearly summaries, and relationships.
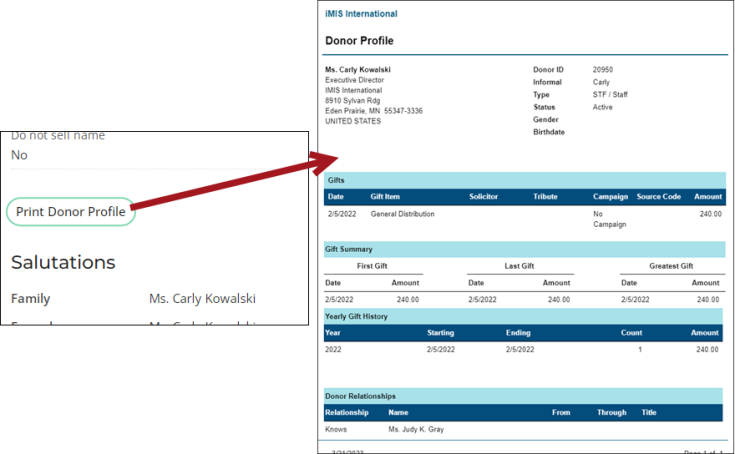
SALUTATIONS
This panel is where a donor can define their salutations, such as their formal and informal name, household name, and their “donation list as” name. Use these names in communication templates or even hand-written thank you cards.

OPEN PLEDGES
If there are open gift, pledge, AutoPay pledge, or installment pledge invoices for the selected contact, they are displayed here. The donor can opt to pay these invoices directly from this area by adding them to their cart. Once the invoice is paid in full, it is no longer displayed in this area.

REQUESTS
Use the Requests area to create new fundraising requests for the selected contact. See Fundraising requests for details.

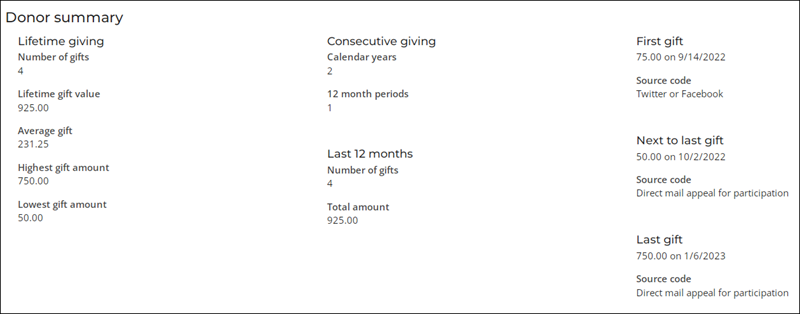
DONOR SUMMARY
The Donor summary displays lifetime giving details, consecutive giving details, gift history over the last 12 months, and details about their, first, next-to-last, and last gift. This information can be extremely useful when you are trying to learn more about the donor’s giving habits.
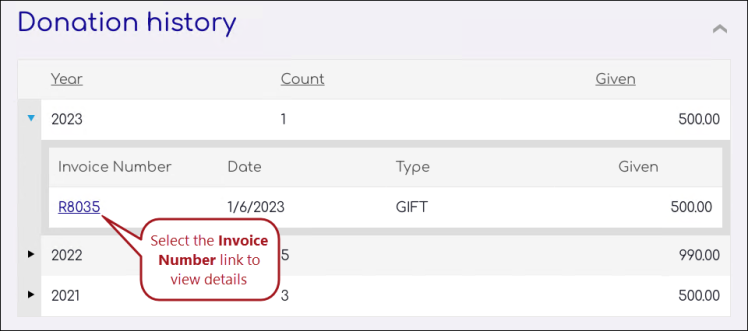
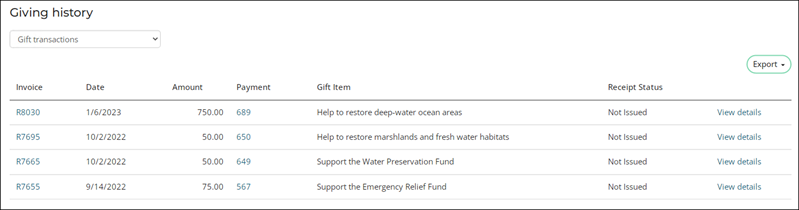
GIVING HISTORY
The Giving history is also an important set of information when you are trying to learn more about the donor’s giving habits. This section provides various queries to choose from, so that you can narrow the type of information you would like to review. Additionally, easily access gift invoices, payments, and receipt status all from the Giving history.
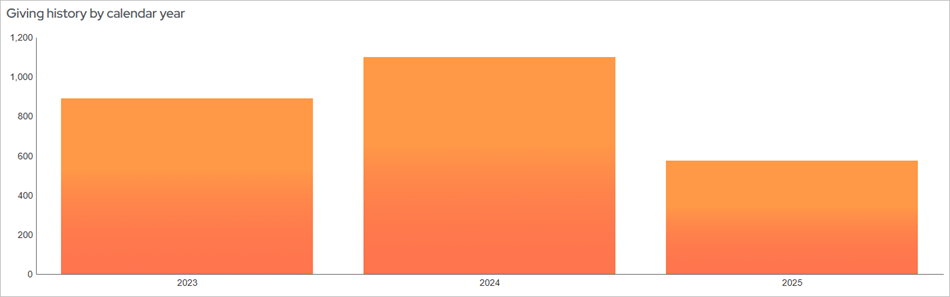
GIVING HISTORY BY CALENDAR YEAR
The Giving history by calendar year section displays a chart of the donor’s giving history, broken into the amount given per year.
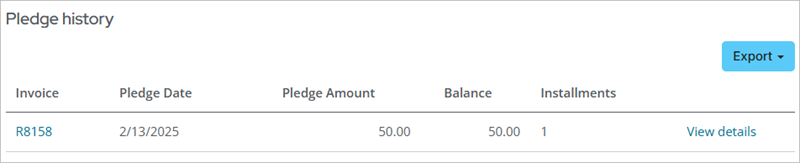
PLEDGE HISTORY
The Pledge history section displays historical pledges for the selected contact.
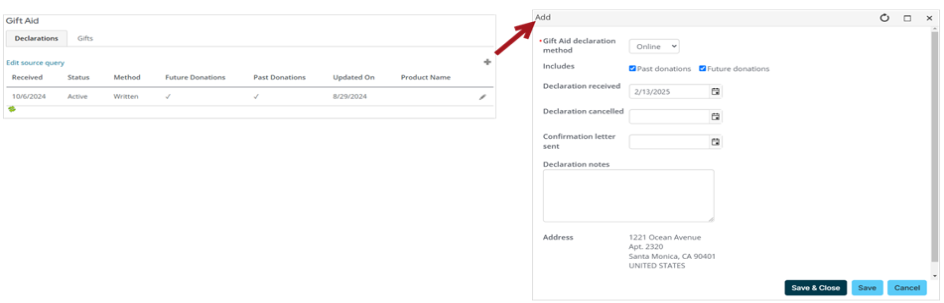
GIFT AID
The Gift Aid section only displays when Gift Aid is enabled. When enabled, the donor’s eligible Gift Aid donations are displayed. See Gift Aid.
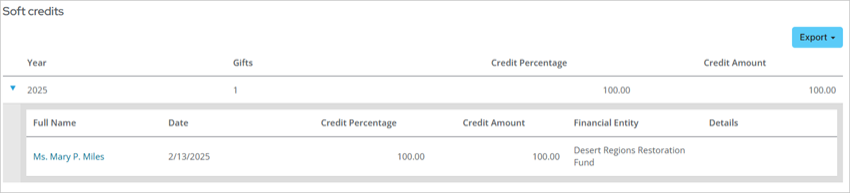
SOFT CREDITS
The Soft credits section displays soft credits entered for the selected contact. A soft credit is a credit for a behind-the-scenes individual who is responsible for helping obtain a gift or pledge, but who is not listed as the donor. See Soft credits for details.
To easily review fundraising data, use one of the out-of-the-box dashboards.
Fundraising dashboard
Go to Fundraising > Dashboard.
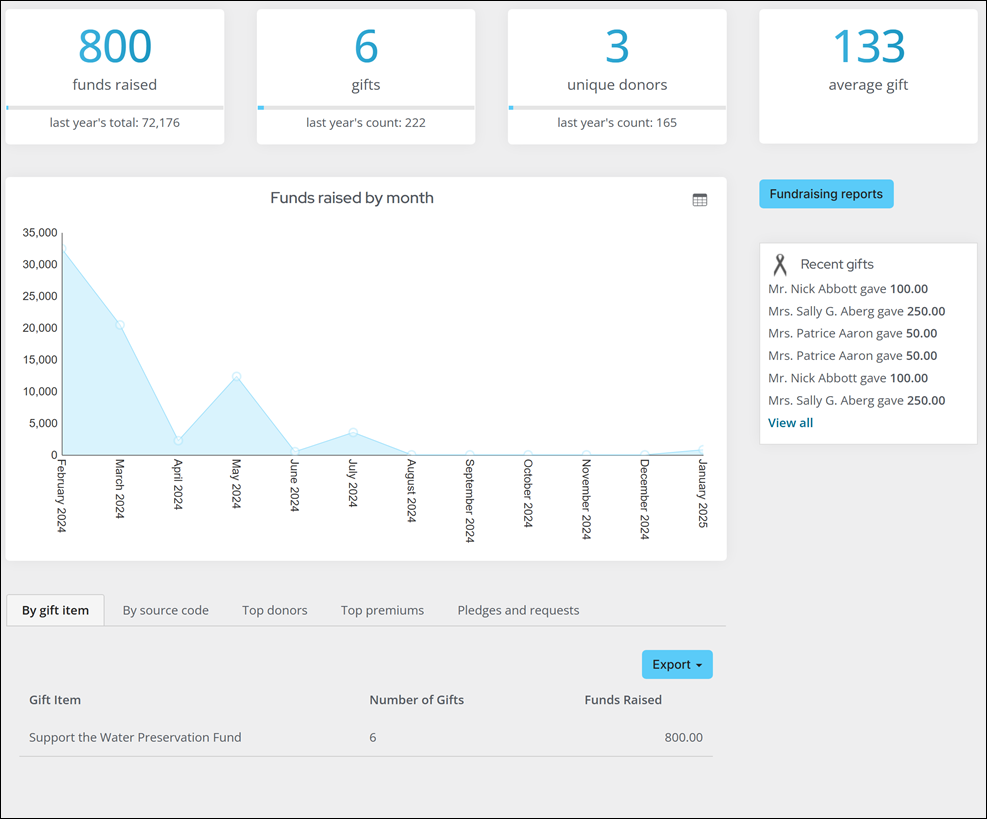
From this dashboard, review the following information:
- Total funds raised for the year and comparison to last year
- Total gifts for the year and comparison to last year
- Number of donors and comparison to last year
- Average gift amount
- Funds raised by month
- Amount of funds raised by gift item
- Funds raised by source code
- Top Donors
- Top premium gift items
- Pledges and requests
- Several fundraising related alerts
Moves Management Dashboard
If you are licensed for Moves Management, go to Fundraising > Moves management > Dashboard.
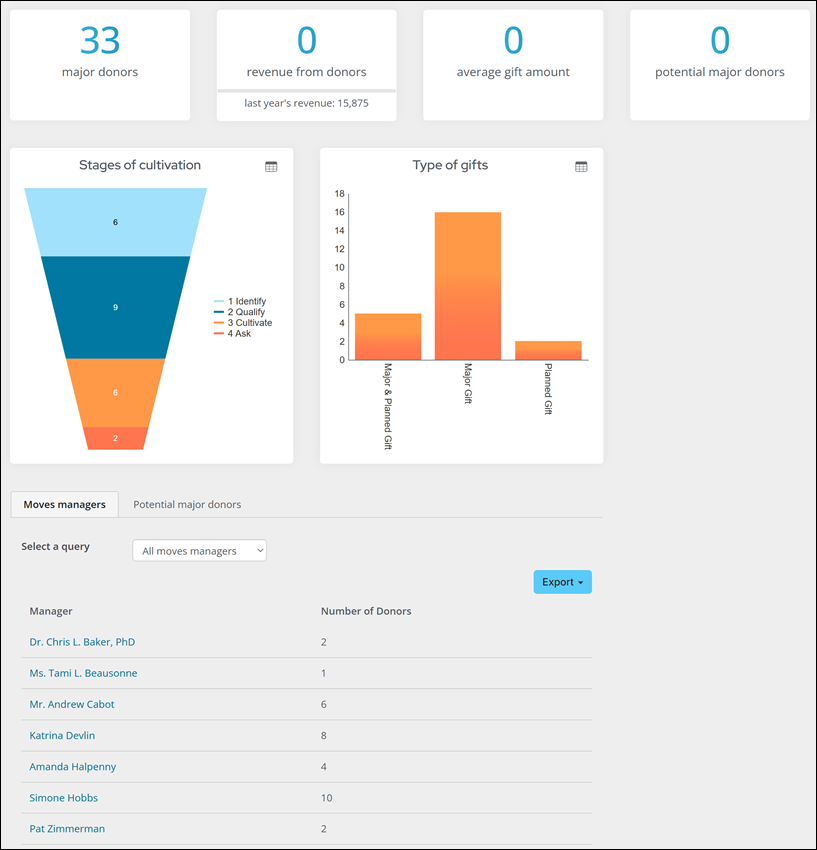
From this dashboard, review the following information:
- The total number of major donors
- The amount of revenue generated by major donors compared with that of last year's revenue
- The average gift amount
- The number of potential donors
- Chart view of the amount of major donors in the certain stages of the cultivation process
- Chart view of the types of gifts received
- An alert for Recent Major Donor gifts showing the name of the donor, the gift amount, and the date the gift was received
- A list of all moves managers and their number of donors
- A list of all potential major donors with their work phone number, email address, and their giving amount
AutoPay Fundraising Dashboard
If you are licensed for AutoPay, go to Fundraising > Automatic payments > Dashboard.
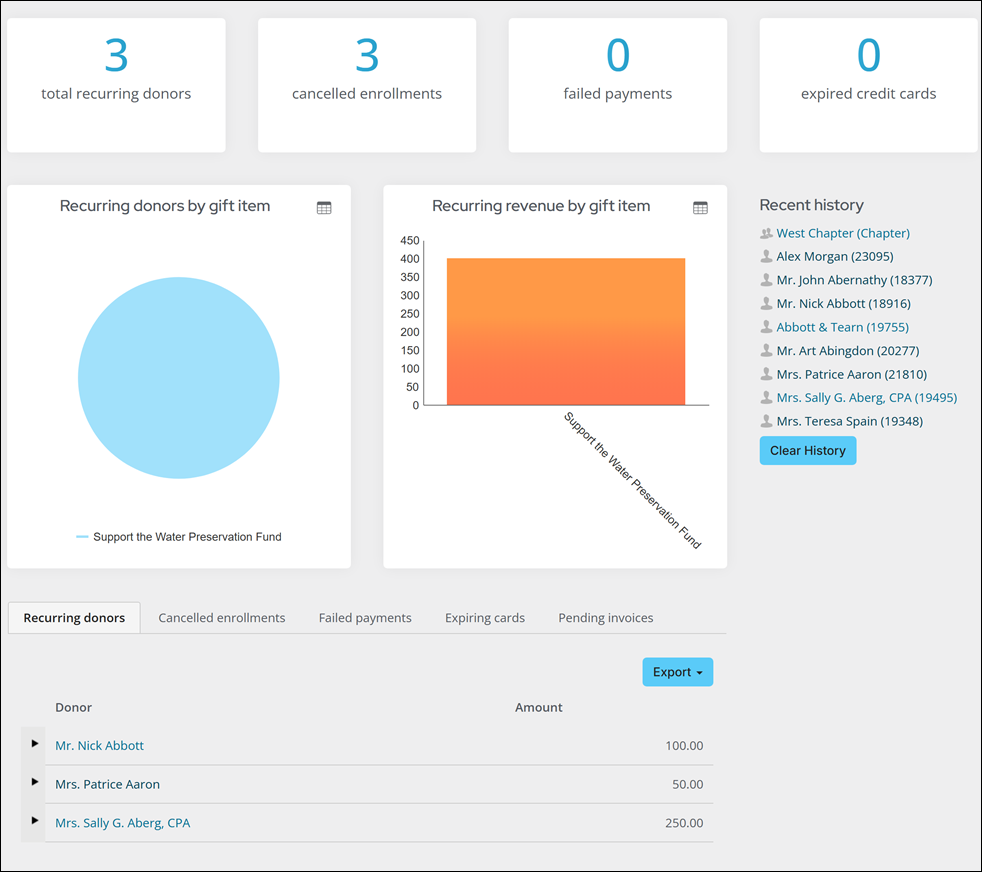
From this dashboard, review the following information:
- Recurring donor (count)
- Cancelled enrollments (count)
- Failed payments (count)
- Expired credit cards (count)
- Recurring donors by gift item (pie)
- Recurring revenue by gift item (bar)
- Recurring donors with expandable detail history (table)
- Cancelled enrollments (table)
- Failed payments (table) with email
- Expiring cards (table) with email
- Pending invoices (table)
- Alert for recurring donation cancellations